Service Manager
Importing or Exporting a Translation Spreadsheet
•About Importing or Exporting a Translation Spreadsheet
•Exporting Language Records to Microsoft Excel from the Translation Tool
•Exporting Language Records to Microsoft Excel from the Languages Workspace
•Importing Language Records from Microsoft Excel
About Importing or Exporting a Translation Spreadsheet
Use the Import from Excel and Export to Excel features to manage strings in a Microsoft Excel spreadsheet. Importing all of the strings to a Microsoft Excel spreadsheet makes it easy to see which strings have not been translated. Also, use this feature if:
•You have customized translation strings and need to back them up or restore them.
•You have strings translated by an outside source.
Also see Setting Up Languages.
When editing an exported translation string spreadsheet in Microsoft Excel, edit the strings in the right-most column only and do not add rows to the spreadsheet. Making changes in other columns or adding rows could result in database inconsistencies when you import the spreadsheet.
Exporting Language Records to Microsoft Excel from the Translation Tool
1.From the Configuration Console, open the Translation Tool as described in Accessing the Ivanti Translation Tool.
If you make any changes, be sure to save before continuing to export.
2.Select the properties to export by checking the property.
3.Click Export to Microsoft Excel.
The application creates a Microsoft Excel spreadsheet with the properties that you selected. Depending on your browser configuration, the application saves the spreadsheet into the default download folder or into a folder that you specify.
After you export the spreadsheet, you can open it and modify the translations strings in the right-most column as necessary.
Exporting Language Records to Microsoft Excel from the Languages Workspace
When using the Firefox browser, the exported file may have the wrong file extension. Change or add the file extension .xlsx to the file before attempting to open it.
1.From the Configuration Console, click Configure > Organizational Profile > Languages. The application displays the Languages workspace.
2.Select the culture name (target language) to export.
3.Decide on an export option:
•Export All: Exports all properties, with or without translations. Choose this option when you want to export existing translations that you have edited.
•Export Since: Exports properties without translations, based on the filters applied.
•Export all strings with missing translations: Exports all the properties without translations.
4.If you decided on the Export All option, in the Export All column of the Languages workspace, click Export next to the target language to export.
The application creates a Microsoft Excel spreadsheet. Depending on your browser configuration, the application saves the spreadsheet into the default download folder or into a folder that you specify.
5.If you decided on the Export Since option, do the following:
| a. | In the Export Since column of the Languages workspace, click Export next to the target language to export. The application displays the Export strings with missing translations dialog box. |
Export Strings with Missing Translations Dialog Box
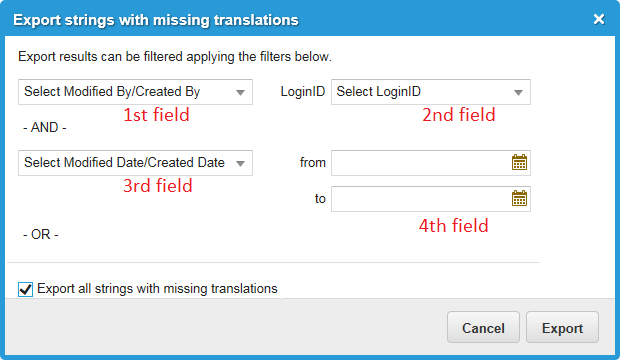
| b. | From the drop-down menus, do the following: |
•In the first field, select either Modified By or Created By.
•In the second field, select the login ID of the person who made the modification or created the translation.
•In the third field, select either Modified Date or Created Date.
•In the fourth field, enter the range of dates in which the modification or creation took place.
| c. | Click Export. |
The application creates a Microsoft Excel spreadsheet. Depending on your browser configuration, the application saves the spreadsheet into the default download folder or into a folder that you specify.
6.If you decided on the Export strings missing translations option, do the following:
| a. | In the Export Since column of the Languages workspace, click Export next to the target language to export. The application displays the Export strings with missing translations dialog box. |
| b. | Check Export all strings with missing translations. |
| c. | Click Export. The application creates a Microsoft Excel spreadsheet. Depending on your browser configuration, the application saves the spreadsheet into the default download folder or into a folder that you specify. |
Importing Language Records from Microsoft Excel
If you are adding an all-new culture (language), see Adding a Language and Culture Without Translations.
1.Do one of the following:
•From the Configuration Console, open the Translation Tool as described in Using the Ivanti Translation Tool. Click Import from Microsoft Excel. The application displays the File Upload dialog box.
•From the Configuration Console, click Configure > Organizational Profile > Languages to open the Languages workspace. Next to a language, click Import.
2.Navigate to the spreadsheet, select it, and click Open. Importing takes several minutes and depends on file size. When completed, the application displays an Import was successful message.
3.Click OK.
4.To view the imported language records, run a new search to view the updated records.
Was this article useful?
Copyright © 2019, Ivanti. All rights reserved.